The setup of kiosk mode in VMware Horizon View requires the use of the command line tool vdmadmin.
Step 1: create a new organisational unit (OU) specific for kiosk users
This OU will contain all kiosk mode VDIs and all accounts that will have access to a kiosk mode VDI. Specific GPOs can be associated with this OU to lock down the VDI session.
Example: OU=kiosk,OU=vdi,DC=mydomain,DC=local
Step 2: create a new Active Directory Security group
This security group will contain all accounts that will have access to a kiosk mode VDI
Example: sg_kioskMode
Step 3: create a new floating Desktop pool in VMware Horizon View
Add all the VDIs to the OU created in Step 1
Make sure to delete or refresh the VDI immediately at logoff
Entitle the group you created in step 2 to this desktop pool
Step 4: Set default values for the organisational unit (OU), password expiration, and group membership of clients in kiosk mode.
This is done by executing the vdmadmin command line utility. The vdmadmin utility is located at C:\Program Files\VMware\VMware View\Server\tools\bin of each VMware Horizon View Connection server and should be executed from a command line (as administrator) directly from a VMware Horizon View Connection server.
NOTE: if you aren’t using a security group use “-nogroup” instead
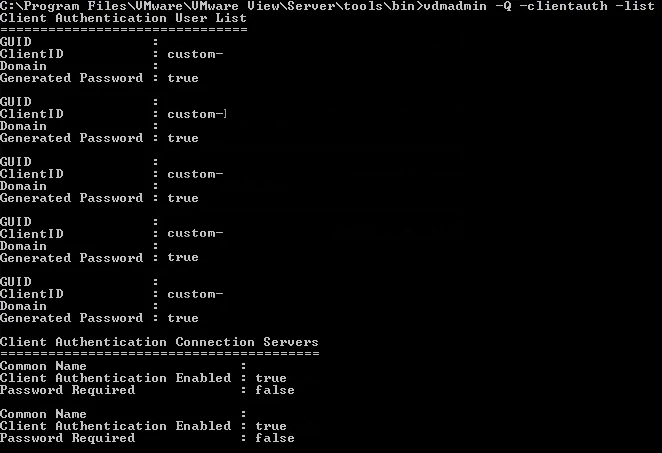
Step 5: Add accounts for clients in Kiosk mode
The VMware Horizon View Connection Server creates Active Directory user account and passwords for each client based on the client’s MAC address or client ID, which it uses to authenticate the client when connecting it to the View desktop.
The clientid parameter must be in the form <MAC-address>, cm-<MAC-address> or custom-<name> where <MAC-address> is of the form aa:cc:ff:aa-33-99
I’ve been doing some EUC projects lately and had a requirement to do a Mandatory profile. As there were a number of little bugs in the version I was capturing (Windows 10 64 bit 1803) I’m putting some of the answers here to keep them together for future use. These have been compiled from various sources including the fantastic James Rankin to whom I owe many thanks for discovering and sharing the most complex steps in this process.
I’ll start off with the workarounds and prerequisites, as there are a number of them, including the requirement to create an unattend.xml file for sysprep to copy over default profile which can then be exported to a mandatory profile.
Installing Windows ADK Setup fails
First off, the very annoying bug which causes the install of the Windows 10 Windows Assessment and Deployment Kit (ADK), which we will use later for creating the unattend.xml answer file, to fail and roll back with little information. This is overcome by running it with PSExec from SysInternals (HERE).
The Windows ADK can be downloaded HERE and installed on a machine where you will have access to the Windows 10 install.wim, this can either be on the Windows 10 profile capture VM, or just your normal machine.
First step, download PSExec, from the above, and extract it somewhere convenient (I used c:\psexec\). Then we need to copy the downloaded ADK into this folder.
Open a powershell window and change into your psexec folder and run the following command
.\PsExec.exe /sid powershell.exe
In the new powershell 1.0 window that opens, change into your psexec directory again and run the ADK installer
.\adksetup.exe
Now complete the installer as normal, but be amazed that it now doesn’t rollback and actually installed. Hurrar.
We only need to install the “Deployment Tools” option, so unselect everything else and install.
Convert Install.ESD to Install.WIM
If you’re not using Windows Enterprise, chances are the install.wim file isn’t in the DVD sources directory, but there is an install.esd. So how do you get the wim file needed for creating the unattend.xml answer file?
First things first, we need to copy the install.esd from <DVD>:\sources\install.esd to a read/write folder, the easiest is the root of c:\
Once we’ve got the esd file we need to run a dism command to find the correct image for our install and then extract that image from the esd into a wim
dism /Get-WimInfo /WimFile:install.esd
Take a note of the number which corresponds to your version, for example on my DVD Windows 10 Pro is Index “6”. Now we know which image, lets extract our wim
If you receive an error, then change the /Compress variable from “max” to “fast”, “none” or “recovery”.
Creating the unattend.xml answer file
Now we can create the unattend.xml answer file I alluded to earlier, in order to tell sysprep what to do.
Firstly run “Windows System Image Manager” which we installed as part of the ADK earlier. From the File menu, choose “New Answer File”. On the pop up messagebox click [Yes] and then point to the install.wim file we copied to our c:\ drive earlier. Click [Yes] to create a catalogue file.
In the bottom left “Components” section, right click on the item starting with “amd64_Microsoft-Windows_Shell-Setup” and select “Add Setting to Pass 4 specialize” which will add it to the “Answer File” section
Click on this heading under “Specialize” and set the CopyProfile property on the right-hand pane to “true”. Set any other options within the answer file you wish, however we only need this one.
Validate the answer file by selecting Tools –> Validate answer file, and then save it to the root of c:\ drive as “unattend.xml”
If you built this on another machine, now copy the file to the root of your capture VM.
If you have no network access, there is always the PowerCLI applet Copy-VMGuestFile. However this will require a local user account and VMTools installed so will not work in Audit Mode.
Now we’ve finished discussing prerequisites, lets go look at creating our new profile.
In case you have problems creating the unattend.xml this is a precanned one for Windows 10 1803 Enterprise. It may well work on other versions as well.
Due to the changed way of capturing a mandatory profile in Windows 10, we are now required to create a custom default profile with which to generate our mandatory profile.
The first step is to deploy a new VM, install Windows 10 to the configuration point, and enter Audit Mode.
So when you get to the above screen after installing Windows 10 you need to hammer Ctrl + Shift + F3 which will log you in as Administrator in Audit Mode.
Cancel the sysprep dialog box and make any changes you want on a device or user level. You can remove the Universal Windows Platform (UWP) apps here as well, I created an article on this HERE. Typical user level changes are:
Setting the background image and branding
Changing Explorer to open “my PC” instead of “Quick Access”
Show file extensions
Create any desktop icons as required
Pin Taskbar items
Arrange and remove the Start tiles
Configure IE/Edge homepage
Once all this is done we need to export the Start tile layout
If you haven’t already created the unattend.xml answer file, install the Windows ADK and create it now as above. If you’ve created it on another machine, copy it to the root of the c:\ drive
Once we’ve created the answer file and put it on the root of the capture VM, we need to run sysprep.
If sysprep fails to run for any reason, check the log file, but the most likely culprit will be a UWP which was removed from one place but not the other. The log file will detail which one is causing the conflict.
Once complete the VM will shutdown with the new default profile.
Additionally we can shrink down this default profile using the following commands from a powershell or cmd window by restarting the VM, and either entering audit mode again or completing sysprep.
We could leave this here which would be suitable for many VDI installs, however I will go on with the creation of the mandatory profile.
Creating a mandatory profile
Having completed all of the steps from above, log on to the VM as an administrative user.
Open the Advanced section of System settings (either from Control Panel, Win + Break or Right click on My PC and click Properties). Click on the Advanced tab, and click on Settings to get to the User Profiles dialogue.
Click on the Default Profile and click [Copy To].
Fill in the “Copy profile to” location with the folder where you would like to store the mandatory profile.
I store it on the root of the c:\ drive and call the folder “mandatory.v6” as 1803 has profile version 6
Check the “Mandatory profile” checkbox.
Click [Change] and add “Authenticated Users” into the Object field.
Click [OK] and the folder you have specified as a destination will be created.
Weirdly there is no success message and the window remains open after clicking [OK], so hit [Cancel] to exit the dialog box.
Bug Time!
So there’s a weird bug in at least this version I’m using (1803) where it doesn’t copy the ntuser.dat and .ini files into the new folder. Helpful. If this happens to you, just go ahead and copy these two files from c:\users\default into your new folder.
Set permissions on filesystem
Now we’ve got our mandatory profile, we need to check that the filesystem permissions are correct. The copy will have added “Authenticated Users” with Read and Execute permissions, but we also need to add the “All Application Packages” user with “Full Control” and ensure that the Administrators group owns the folder, along with all subfolders.
So add these permissions and set them to replace all child objects and press [OK]
Set permissions on Registry
We also need to set the same permissions for the Registry. So lets fire up regedit, click on the HKEY_USERS hive, go to File –> Load Hive and select the ntuser.dat file from our mandatory profile folder.
Give the hive a temporary name (this doesn’t affect anything) and the hive name will now show under HKEY_USERS.
Right-click on the root of the hive and select Permissions.
Modify the permissions to allow both “Authenticated Users” and “All Application Packages” to have “Full Control”
Click [OK] and [OK] again on the error that pops up.
Clean up the Registry
Now we can clean up the Registry to trim it down a bit.
Remove all references to the Administrator username from the Registry hive using Edit –>Find
Delete any Registry keys or values that you deem unnecessary. For example:
any Policies keys under HKCU\Software
HKCU\Software\Microsoft\Windows\CurrentVersion.
HKCU\Software\AppDataLow
Other people have managed to massively reduce the ntuser.dat by being ruthless. I will have to test how far we can go but feel free to follow their suggestions.
Once complete you must remember to unload the hive by selecting the hive name you chose and going to File –> Unload Hive
If you don’t do this, you will lock the profile meaning no one will be able to access it.
After unloading the hive there will be a number of new *.log* and *.blf files in the folder, these can be deleted.
Making it Mandatory
To make this profile “mandatory” we need to rename the ntuser.dat file to ntuser.man. Additionally you can rename the folder to mandatory.man.v6 to make it super-mandatory! This just means that a temporary profile will never be used.
Finally some Group Policy
Setting the mandatory profile in group policy requires us to set the following:
Computer Configuration –> Policies –> Administrative Templates –> System –> User Profiles
Set “Set roaming profile path for all users logging onto this computer” to the profile location but omit the .V6 extension.
In addition to applying the mandatory profile, we need to set one additional option, else you will suffer from a broken Start Menu.
I was asked to join a podcast with my colleague Matt Tupper to discuss all things VDI.
Joining us in this episode are Senior Consultants, Matt Tupper and Chris Mitchell, who talk us through Virtual Desktop Infrastructure (VDI). Our guests investigate the importance of VDI, its appeal to organisations, the key players within the space and the benefits that it’s adoption is bringing.
Matt and Chris also explore the trends in the adoption of VDI that Xtravirt are seeing among their clients, the potential pitfalls clients come across when moving towards it and the questions to ask to avoid mistakes, as well as where the future is heading.
What is VDI and why is it important?
Which market factors are driving adoption of the VDI model?
Who are the key players within VDI?
What are the potential pitfalls when moving towards a VDI model?